
revised: 09/28/07, 11/8/2010, 08/03/2012, 11/13/2015
This section discusses digital images and image file formats.
The pixels in gray level
images may be all levels from black to white.
Gray level images are sometimes called "black-and-white"
images, but this is a misleading term because
they have more levels than
just black and white.
Sometimes greay level images are called "monochrome" images.
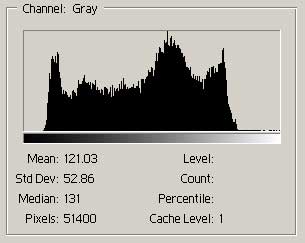
Here is a gray level
image, kernighan.jpg. On its right is a chart that shows how many
pixels there are at each gray level from 0 (on the left) to 255 (on the right).
|
|
| Gray-level Image | Histogram of Image |
An image that truly has only two tones ― black and white ― is best called a bi-level image.
Sometimes such images are called "bit mapped" images
or "two-tone" images.
Here is a bi-level version of kernighan.jpg
(created by using IrfanView):
The above image creates the illusion of many gray levels by adjusting the number of black dots in a region depending on how dark the region should be.
Think of a gray level image as a 2D array of little squares, like a sheet of
graph paper. Each little square is filled with a single gray level. The kernighan.jpg
image consists of 200 squares across by 257 squares down. Here is an enlargement
of a 42 by 42 part of that image that shows the individual squares, each filled
with a single gray level.
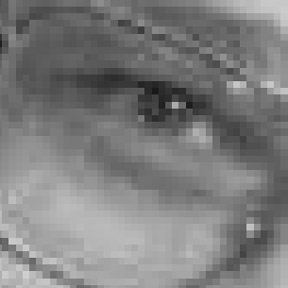
Each little square of a digital image is called a pixel.
Often, each pixel of a gray level image is stored as a single byte in an image file.
The size of an image is sometimes expressed in terms of the number of pixels across
and the number of pixels down. The image kernighan.jpg is 200 pixels
across by 257 pixels down (for a total of 51,400 pixels). The job of an image
display program (or the part of a web browser responsible for images)
is to display a digital image in a rectangular part of the monitor.
An image of any size (in terms of pixels) can be displayed on a monitor in a rectangle of any size. The display system (software, graphics board, and monitor) takes the digital image and fits it into the specified rectangle. Usually this involves stretching or shrinking the image as needed to fit the rectangle. Image pixels themselves do not have a geometrical size. An image display program uses the pixel data from the image to "paint" the rectangle as best it can. If there is not enough data the painted image will not be clear. If there is abundant data the painted image will be sharp.
Here is the image file, kernighan.jpg, displayed
in rectangles of several sizes. The size of the rectangles on the display is given
in terms of "display pixels" (see next section).
The same number of image pixels are displayed in each rectangle,
so the display software and hardware must stretch out or squeeze the
same amount of image data to fit the designated area.
| |
|
|
Image size: 200 x 257 (image file pixels) Display size: 300 x 350 (display pixels) |
Image size: 200 x 257 (image file pixels) Display size: 200 x 257 (display pixels) |
| |
|
|
Image size: 200 x 257 (image file pixels) Display size: 100 x 129 (display pixels) |
Image size: 200 x 257 (image file pixels) Display size: 200 x 150 (display pixels) |
Most image file formats start with information about the image (a "header"). Most headers describe both the size of the image in image pixels and the intended display size. An image intended for display at a particular size might be low resolution (few pixels for its intended display size ) or high resolution (many pixels for its intended display size). Of course, the display program can ignore the intended size for an image and display it at any size.
Often the size of a rectangle on a display screen is expressed in display pixels. For example, a monitor might be set up so that its screen is 1024 pixels by 768 pixels. This means that the width of the monitor is conceptually divided into 1024 parts and that the height of the monitor is conceptually divided into 768 parts. Think of the screen as graph paper with 1024 squares across and 768 squares down. These squares (display pixels) do not directly correspond to the pixels of an image and do not necessarily correspond to the little dots of light that the monitor can physically display.
On a Windows system, you can set the number of display pixels for a monitor by right-clicking on the "desktop", clicking "properties", clicking "settings" and then adjusting the slider to say how many pixels you want the screen to be to be divided into. You can pick from several sizes for the display, no matter what physical characteristics the monitor has. (The minimum size and maximum size depend on what the monitor can support, however.)
In the picture, monitor number one has been set so that its display area is logically divided into 1024 display pixels across and 768 pixels down.
Often a system is set up so that the display resolution in terms of screen pixels corresponds directly to the actual spots of light that the display can physically produce. This is often done with LCD and LED displays. For example, if a laptop's screen can physically produce 1024 by 768 spots of light, it is best to set it to 1024 by 768 display pixels.
In summary: there are three things called "pixels:"
Only rarely do these three things exactly correspond one to one.
Unfortunately, there is no standard vocabulary used for these three types of pixels. The vocabulary used to describe consumer electronics is often very misleading.
Display pixels are used to specify the size of rectangles on the screen. The image pixels supply the information that is used to paint that area. For example, the first display of the Kernighan image (above) is displayed in a rectangle that is 300 display pixels wide by 350 display pixels high. My monitor has a width of 14 inches and is set to 1024 display pixels across. So the width of the first displayed Kernighan image (on my monitor as it is currently set up) is:
     14 inches
------------------   *   300 display pixels   = 4.1 inches
1024 display pixels
If your monitor is (say) 12 inches wide and set up to 1152 pixels across, the width of that same image will be:
     12 inches
------------------   *   300 display pixels   = 3.12 inches
1152 display pixels
Often images are displayed with the assumption that there are 72 display
pixels per inch on the monitor. The 200 x 257 kernighan.jpg
image uses this standard and should be displayed in a rectangle of 200/72
by 257/72 inches (2.78 inches
by 3.57 inches). Often a computer has not been set up with much care and images
are displayed at other than their intended sizes.
The pixels in the 2D array of a digital image are indexed by using their row number and column number. In this diagram, the pixel marked with an x is in row 4 column 8.
Unfortunately, there are several ways to index pixels. Different software systems use different conventions. Sometimes images are indexed using X and Y coordinates, sometimes row and column, and sometimes row 0 is at the bottom and sometimes at the top.
In these notes, pixels are indexed the same way as elements of a 2D array, using rows and columns with row zero at the top. For us, the above pixel is at row=4 column=8.
Each pixel of a gray level image can be total black or total white or a level in between. When a region of an image is total black, it is displayed with the monitor's minimum brightness. When a region of an image is total white, it is displayed with the monitor's maximum brightness. The minimum and maximum brightness of a monitor depend on its current settings and the settings of the graphics board.
For the images of these puzzles (and for the majority of gray level images), the range from black to white is divided into 256 steps. Level 0 corresponds to black, and level 255 corresponds to white, and levels in between correspond to various levels of gray. Each pixel of an image can have a value from 0 to 255. A single byte (of 8 bits) can hold this range of values. So for our images, each pixel will correspond to one byte.
Images are stored as disk files. There are various formats for these files: TIFF, GIF, JPEG, BMP and so on. Most of these formats are complicated, so we will not deal with them. For gray level images, these notes use Portable Gray Map files, PGM files.
The main job of an image file is to store the pixels. For PGM files, one byte of the file is used for each pixel of the image. One byte can hold values from 0 to 255 using unsigned binary. So the the range of gray levels of PGM images is 0 to 255. In other image file formats, pixel data is compressed so that there is not a one-to-one correspondence between bytes of the file and pixels. This is like a text file, where each character corresponds to one byte, and a compressed text file, where the one-to-one correspondence is lost.
An image file starts with an image header which describes the image. The following table shows what is in a PGM image file, byte by byte:
| ASCII characters: 'P' followed by '5' followed by one or more whitespace characters (often ending with a newline character). |
| Zero or more comment lines. Each line starts with a # and ends with a newline character. |
| Width of image in pixels. ASCII characters indicating a decimal value, followed by one or more whitespace characters (often ending with a newline character). |
| Height of image in pixels. ASCII characters indicating a decimal value, followed by one or more whitespace characters (often ending with a newline character). |
| Maximum value of a pixel. ASCII characters indicating a decimal value, followed by a single whitespace character, often a newline. For us the maximum value will always be 255. |
| The pixel data, one byte per pixel, using unsigned binary (not ASCII). |
The PGM file starts out with literally the ASCII characters "P5" followed by whitespace characters (often newline). These two bytes are sometimes called the "magic number" that identifies the image format. Sometimes these bytes are called the "signature".
Next there may be several lines of comments. Each line starts with the character "#" and is followed by ordinary ASCII text. Each line ends with newline.
Following this is the width, height, and maximum pixel value. Each of these is represented with ASCII characters. Each value is separated from the next with one or more whitespace characters, except the maximum value should be followed by just one whitespace character, which is usually the newline character.
The pixel data consists of one byte of the file per each byte of the image.
Bytes (when regarded as small integers) have values 0 to 255. Notice that pixel
values for PGM files are NOT encoded as ASCII. For example, a pixel value of
122 is stored in a single byte (holding the bit pattern 0111
1010), not as the three characters '1' followed by '2'
followed by '2'.
The pixels of the 2D image are stored in raster order: the bytes in row 0 are stored first (from left to right), then row 1, then row 2, and so on.
Here is how a 2 row by 3 column gray level image is stored. Say that all the pixels of row zero have gray level 23 and that all the pixels of row one have gray level 77. This image file has no comments. Notice that there is nothing in the pixel data that separates one row of pixels from the next.
| byte number | value | Comment |
|---|---|---|
| 0 | 'P' | ASCII character 'P' (the bit pattern 0x50) |
| 1 | '5' | ASCII character '5' (the bit pattern 0x35) |
| 2 | ' ' | space (the bit pattern 0x20) |
| 3 | '3' | width, in ASCII (the bit pattern 0x33) |
| 4 | ' ' | space |
| 5 | '2' | height, in ASCII (the bit pattern 0x32) |
| 6 | ' ' | space (the bit pattern 0x20) |
| 7 | '2' | number of |
| 8 | '5' | gray levels, |
| 9 | '5' | in ASCII |
| 10 | ' ' | space |
| 11 | 23 | pixel row 0 col 0 |
| 12 | 23 | pixel row 0 col 1 |
| 13 | 23 | pixel row 0 col 2 |
| 14 | 77 | pixel row 1 col 0 |
| 15 | 77 | pixel row 1 col 1 |
| 16 | 77 | pixel row 1 col 2 |
Of course, this is a ridiculously small image, used only to discuss the disk file format.
The following C program creates this tiny PGM image file.
#include <stdlib.h>
#include <stdio.h>

int main(int argc, char *argv[])
{
  putchar( 'P' );    /* Signature */
  putchar( '5' );    /* Signature */
  putchar( ' ' );    /* space     */

  putchar( '3' );    /* width  */
  putchar( ' ' );    /* space  */
  putchar( '2' );    /* height */
  putchar( ' ' );    /* space  */
  putchar( '2' );    /* max    */
  putchar( '5' );    /* gray   */
  putchar( '5' );    /* level  */
  putchar( ' ' );    /* space  */

  putchar( 23 );     /* row 0 col 0 */
  putchar( 23 );     /* row 0 col 1 */
  putchar( 23 );     /* row 0 col 2 */

  putchar( 77 );     /* row 1 col 0 */
  putchar( 77 );     /* row 1 col 1 */
  putchar( 77 );     /* row 1 col 2 */
}
Recall that the C-function putchar() sends a single
byte to the output stream.
The statement putchar( 'P' ) puts a single byte, containing the
ASCII code for the character 'P'. The statement putchar( 23 ) puts a single byte, containing the
value 23 encoded as unsigned binary.
Use Dev-C++ to create this program. Then run it and use redirection to send
the output to a disk file smallFile.pgm:
C:\>makeSmall > smallFile.pgm
Potential Gotcha: When a program outputs a newline character on a Windows
system, the I/O system will transform it into two control characters: carriage-return
followed by newline.
Those two characters are the proper line termination sequence for text files on Windows.
In other words if your program executes putchar( 0x0a ) , two bytes
will be written: 0x0d followed by 0x0a.
When processing text files, this is OK.
But you can run into trouble with "binary files" like image files.
For example, the last character in the PGM header should be followed by a single whitespace character. Any extra characters count as pixel values.
Another problem is that when reading pixels,
a similar mechanism transforms
the two byte input sequence 0x0c0a (carriage-return linefeed)
into the single byte 0x0a.
If (by some chance)
the pixel data contains that sequence, one pixel will be lost. This will completely
mess up the image display.
These problems can be avoided by opening image files for "binary" I/O. This turns off the mechanism that transforms bytes. See the answer to puzzle I01 for instructions on how to do this.
The image file smallFile.pgm is so small that IrfanView does not
really show a picture when it opens the file. Here is the file opening dialog:
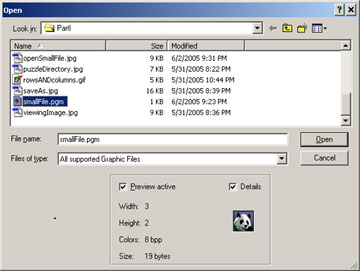
IrfanView correctly determines that the file is width 3, height 2, and has eight bits per pixel.
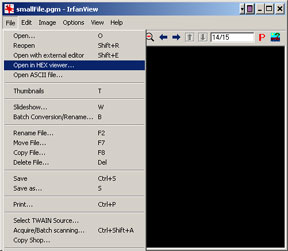
The image display (after you click "open") is useless because the image is so small. However, you can click the "zoom" button (the magnifying glass with a + inside it) to see a zoomed view. Also, IrfanView has a hex viewer that is sometimes useful for images. Click on File, then Open in Hex Viewer...
Browse to the image file and open it. You see a display that shows the values of the individual bytes of the file. The value of each byte is displayed in hexadecimal:

The bytes of the file are displayed eight per row. The left column shows the
location of the first byte of the rows. Byte number 00000000 of
the disk file has hex pattern 0x50. This is the ASCII code for
the character 'P'. The 'P' is seen to the right on this line. The next byte
of the file has the hex pattern 0x35. This corresponds to the character
'5'. Byte number 00000008 of the disk file has hex pattern 0x32,
corresponding to the character '2'. When a byte holds a value that does not
correspond to a character, the character display shows a black rectangle. The
display shows 'M' for pixels that have the value 0x4D, which happens to be the
ASCII code for that character.
The following C program creates a 256 by 256 PGM image file. All of the pixels in this file have the value 127 (medium gray):
#include <stdlib.h>
#include <stdio.h>

int main(int argc, char *argv[])
{
  int row, col;

  printf("P5 256 256 255 ");  /* P5 cols(width) rows(height) maxGray */

  for ( row=0; row<256; row++ )
    for ( col=0; col<256; col++ )
      putchar( 127 );
}
This program outputs the image header information using a single printf()
statement. The potential gotcha (see above) has been avoided by not outputting
any linefeed characters. Run the program,
redirecting the output to a disk file:
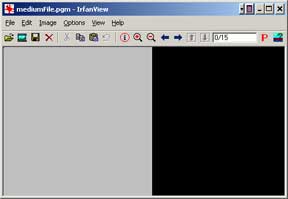
C:\>makeMedium > mediumFile.pgm
Now when you use IrfanView to look at the file you should get a nice, big, gray image. The image is the gray rectangle on the left. The black rectangle on the right is "left over" space not used by IrfanView.
The programs in this section create images in the PGM format. This might disappoint
you if you want to play with images stored in a more popular format.
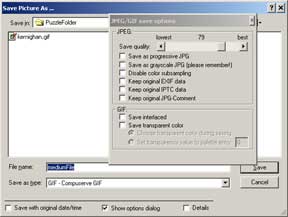
Luckily, with IrfanView you can convert your images into other formats. If you are
viewing the mediumFile.pgm image, saving it to a GIF file automatically
converts the image to that format:
You can now write programs that create gray level images in various ways, and convert them to any format you please! If you have some idea for a crazy image pattern, you can create it with a program. Sounds like time to think about some puzzling patterns...
 — Return to the main contents page